今回はUnityのIKを使ってアニメーションをスクリプトから操作してみようと思います。
今まではアニメーションクリップを作成し、アニメーターによってアニメーションの遷移を行っていました。
しかし、キャラクターが物を持とうとした時に物のオブジェクトとアニメーションの手の位置がうまく合ってくれなかったりします。
しかしIKを使えば手の位置を物の位置や角度に合わせて調整するという事が出来るようになります。
今回はその機能を使ってキャラクターがはしごを登るようにしてみます。
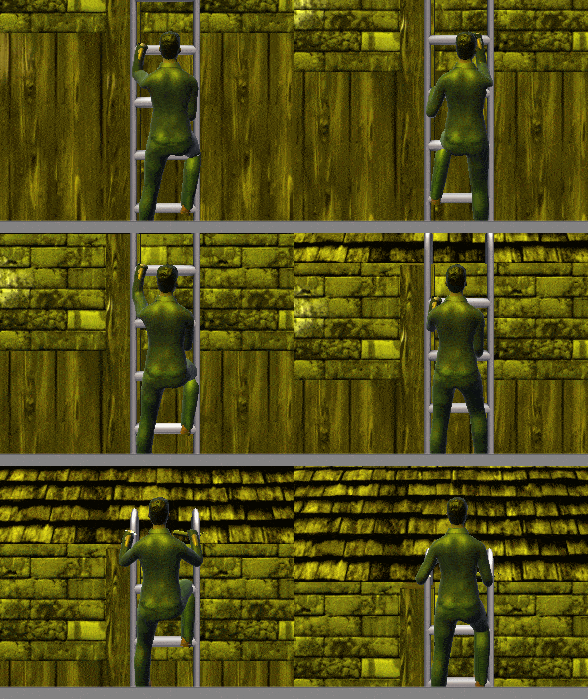
機能を作成すると、
↑のような感じのものが出来上がります。
IKだけではしごを登っているように見せている為、体が硬い感じですね。
値を調整したりする事でも改善出来るとは思いますが、やはりIKだけだとちょっと難しいですね。
後ははしごを登り切った後のワープが気になる・・・・((+_+))
今回使用するはしごはAsset Storeにある「Free Steel Ladder Pack」を使用させて頂く事にします。
その中のLadderCombinationSampleを使用します。
キャラクターが昇るはしごの設定
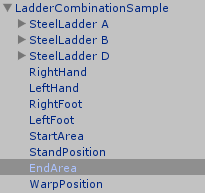
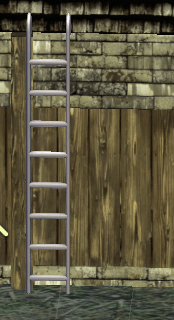
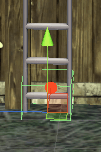
上のようにはしごを設置し、RightHand、LeftHand、RightFoot、LeftFoot、RightKnee、LeftKnee、StartArea、EndArea、WarpPosition、StandPositionを作成します。
HandとFootと名のついたものはここに手と足がくる位置になります。ここを移動させて手と足の位置を動かしていきます。
Kneeは膝の向ける方向を指定します。
StartAreaは、はしごに登るのを開始する検知エリアです。EndAreaははしごを登りきったのを検知するエリアです。
StandPositionははしごに登るのを開始するキャラクターの位置を指定するものです。
WarpPositionははしごを登りきった時にキャラクターを移動する場所です。登りきった後に地面がある所に移動させないと重力で落下してしまう為に用意してあります。
はしごは上の画像のような感じです。
これから作成するスクリプトははしごの大きさによってパラメータを変更する必要があります。しかもかなり細かく・・・(^_^;)
ただ一度作ってしまえばそのはしごをプレハブ化して使い回しがききますので、安心してください(はいてますよ)。
はしごのScaleの調整
まずは梯子の大きさを変更します。
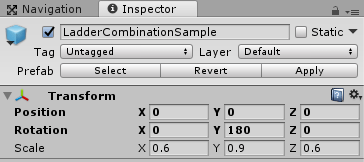
Scaleを↑のように変更し、Y軸で180度回転しておきます。
回転はカメラの向きにはしごを登らせる為に回転しただけです。
ただここではしごの親元を回転したことで、子要素のRightHand、LeftHand、RightFoot、LeftFootのY軸の角度も180にします。
さらにRightHandとLeftHandのX軸の角度を320にして、手の角度が梯子の持つ部分に合うように角度を設定します(実行しながら目的の角度を探します)。
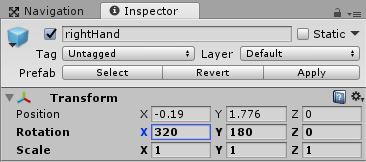
StandPositionは
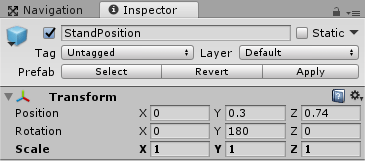
↑のような位置に調整しました。
StartAreaの検知エリアを作っていきます。BoxColliderを追加してください。
上のように小さいエリアにしておきます。
なぜなら敵に追われている時に誤ってエリア内に入ってはしごを登らせない為です。
キャラクターを検知したらはしごを登る準備をするスクリプトClimbTheLadder
StartAreaにClimbTheLadderという新しいスクリプトを作成します。
1 2 3 4 5 6 7 8 9 10 11 12 13 14 15 16 17 18 19 20 21 22 23 24 25 26 27 28 29 30 31 32 33 34 35 36 37 38 39 40 41 42 43 44 45 46 47 48 49 50 51 52 53 54 55 56 57 58 59 60 61 62 63 64 65 66 67 68 69 70 71 72 73 74 75 76 77 78 79 80 81 82 83 84 85 86 87 88 89 90 91 92 93 94 95 96 97 98 99 | using System.Collections; using System.Collections.Generic; using UnityEngine; public class ClimbTheLadder : MonoBehaviour { private StairChara stairChara; [SerializeField] private Transform rightHand; [SerializeField] private Transform leftHand; [SerializeField] private Transform rightFoot; [SerializeField] private Transform leftFoot; [SerializeField] private Transform rightKnee; [SerializeField] private Transform leftKnee; [SerializeField] private Transform standPosition; // 梯子に上る時の最初の手や足の位置 private Vector3 rightHandBase = new Vector3(-0.265f, 1.776f, 0.16f); private Vector3 leftHandBase = new Vector3(0.3f, 1.818f, 0.16f); private Vector3 rightFootBase = new Vector3(-0.297f, 0.375f, 0.16f); private Vector3 leftFootBase = new Vector3(0.307f, 0.87f, 0.16f); private Vector3 rightKneeBase = new Vector3(-0.47f, 0.963f, 0.16f); private Vector3 leftKneeBase = new Vector3(0.68f, 1.005f, 0.16f); void OnTriggerEnter(Collider col) { if(col.tag == "Player") { if(stairChara == null) { stairChara = col.GetComponent<StairChara> (); } if(!stairChara.IsStairs()) { stairChara.SetStairs(this); } else { stairChara.ResetStairs(); ResetStairs (); } } } public Transform GetRightHandTra() { return rightHand; } public Transform GetLeftHandTra() { return leftHand; } public Transform GetRightFootTra() { return rightFoot; } public Transform GetLeftFootTra() { return leftFoot; } public Transform GetRightKneeTra() { return rightKnee; } public Transform GetLeftKneeTra() { return leftKnee; } public Vector3 GetRightHandBase() { return rightHandBase; } public Vector3 GetLeftHandBase() { return leftHandBase; } public Vector3 GetRightFootBase() { return rightFootBase; } public Vector3 GetLeftFootBase() { return leftFootBase; } public Vector3 GetRightKneeBase() { return rightKneeBase; } public Vector3 GetLeftKneeBase() { return leftKneeBase; } public Transform GetStandPosition() { return standPosition; } public void ResetStairs() { rightHand.localPosition = rightHandBase; leftHand.localPosition = leftHandBase; rightFoot.localPosition = rightFootBase; leftFoot.localPosition = leftFootBase; rightKnee.localPosition = rightKneeBase; leftKnee.localPosition = leftKneeBase; } } |
インスペクタで右手や左手等のTransformを設定出来るようにします。
キャラクター操作スクリプトがStairCharaスクリプトになります。
またはしごを昇る時の最初の右手、左手、右足、左足の位置、右ひざ、左ひざの方向を数値で指定し、rightHandBase等に保持しておきます(実行しながら位置を調整してください)。
一度はしごを使ってrighHandやleftHandを移動してしまうと、2度目にはしごを登ろうとした時にrightHandやleftHandが移動した位置から開始してしまう為、元の位置に戻す時に使用します。
OnTriggerEnterメソッドではPlayerタグを設定したキャラクターが侵入した時にキャラクターの状態がはしごを登っているか通常の時かで処理を分けています。
StairCharaスクリプトのSetStairsメソッドではしごを登る準備をさせ、ResetStairsで通常の状態に戻す処理をします。
自身のスクリプトのResetStairsメソッドではRightHand等を元の位置に戻す処理をしています。
その他Getterメソッドを用意しています。
キャラクター操作スクリプトStairCharaスクリプトの作成
キャラクターにはCharacterControllerコンポーネントとAnimatorが設定されている事、AnimatorControllerにはIdle状態Walk状態が作成されている事と、登っている時用に状態を作成する時はbool型のStairsアニメーションパラメータを作成し、Stairs状態に遷移出来るようにしておきます。
それではキャラクター操作スクリプトStairCharaスクリプトを作成していきます。
宣言部とStartメソッド
まずは宣言部とStartメソッドです。
1 2 3 4 5 6 7 8 9 10 11 12 13 14 15 16 17 18 19 20 21 22 23 24 25 26 27 28 29 30 31 32 33 34 35 36 37 38 39 40 41 42 43 44 45 46 47 48 49 50 51 | using System.Collections; using System.Collections.Generic; using UnityEngine; public class StairChara : MonoBehaviour { public enum State { Normal, Stairs } private CharacterController cCon; private Animator animator; private Vector3 velocity ; [SerializeField] private float walkSpeed = 1.5f; // はしごを上る時の速さの比率 [SerializeField] private float climbLadderSpeedRatio = 1f; private State state; private bool isStairs = false; // 手や足のIKの位置 private Transform rightHandTra; private Transform leftHandTra; private Transform rightFootTra; private Transform leftFootTra; private Transform rightKneeTra; private Transform leftKneeTra; // 梯子を掴んだ時の最初のキャラの位置 private float basePositionY; // 手や足のIKのY座標の値 private Vector3 leftHandPos; private Vector3 rightHandPos; private Vector3 leftFootPos; private Vector3 rightFootPos; private Vector3 rightKneePos; private Vector3 leftKneePos; private ClimbTheLadder climbTheLadder; private float weight = 1f; void Start () { cCon = GetComponent<CharacterController>(); animator = GetComponent<Animator>(); SetState(State.Normal); } |
climbLadderSpeedRatioははしごを登る時のスピードの比率で数値を上げるとはしごを登るスピードが速くなります。
isStairsは階段を上っているかどうかのフラグです。
stateで判断出来るのであえてisStairsを用意する必要もないんですが・・・・。
leftHandPosやrightHandPos等はIKの到達点を一旦記憶しておく為に使用します。
Updateメソッド
ではここからがメインの処理になります。
まずははしごを昇る状態になった時(stateがState.stairs)に関数OnAnimatorIK内で右手、左手、右足、左足のIKのウエイトを1にする必要があります。
IKのウエイトが1になると位置を指定すればアニメーション本体とは関係なくそこに右手や左手がそこに移動するようになります。
また位置だけでなく角度も変更が出来ますので、まずはその処理を記述します。
OnAnimatorIK内に以下の記述を足します。
OnAnimatorIK関数がない場合は足すのと、アニメーターコントローラのレイヤーでIK Passのチェックを入れる必要があります。
1 2 3 4 5 6 7 8 9 10 11 12 13 14 15 16 17 18 19 20 21 22 23 24 25 26 27 28 29 30 31 32 33 34 35 36 37 38 39 40 41 42 43 44 45 46 47 48 49 50 51 52 53 54 55 56 57 58 59 60 61 62 63 64 65 66 67 68 69 70 71 72 73 74 75 76 77 78 79 80 81 82 83 84 85 86 87 88 89 90 91 92 | void Update () { if (state == State.Normal) { if (cCon.isGrounded) { velocity = Vector3.zero; var input = new Vector3 (Input.GetAxis ("Horizontal"), 0f, Input.GetAxis ("Vertical")); if (input.magnitude > 0f) { transform.LookAt (transform.position + input); animator.SetFloat ("Speed", input.magnitude); velocity = input * walkSpeed; } else { animator.SetFloat ("Speed", 0f); } } // 階段を昇る } else if (state == State.Stairs) { velocity.y = Input.GetAxis ("Vertical") * climbLadderSpeedRatio; var nowPos = transform.position.y - basePositionY; if (nowPos < 0.323f) { leftHandPos = climbTheLadder.GetLeftHandBase(); rightHandPos = climbTheLadder.GetRightHandBase(); leftFootPos = climbTheLadder.GetLeftFootBase(); rightFootPos = climbTheLadder.GetRightFootBase(); rightKneePos = climbTheLadder.GetRightKneeBase(); leftKneePos = climbTheLadder.GetLeftKneeBase(); } else if (nowPos >= 0.323f && nowPos < 0.72f) { leftHandPos.y = 2.8f; rightFootPos.y = 1.316f; rightHandPos.y = climbTheLadder.GetRightHandBase().y; leftFootPos.y = climbTheLadder.GetLeftFootBase().y; } else if (nowPos >= 0.72f && nowPos < 1.232f) { leftHandPos.y = 2.8f; rightFootPos.y = 1.316f; rightHandPos.y = 3.3f; leftFootPos.y = 1.816f; } else if (nowPos >= 1.232f && nowPos < 1.643f) { rightHandPos.x = -0.265f; rightHandPos.y = 3.3f; leftFootPos.y = 1.816f; leftHandPos.y = 3.8f; rightFootPos.y = 2.316f; } else if (nowPos >= 1.643f && nowPos < 2.091f) { rightHandPos.x = -0.4f; rightHandPos.y = 4.3f; leftFootPos.y = 2.816f; leftHandPos.x = 0.324f; leftHandPos.y = 3.8f; rightFootPos.y = 2.316f; } else if (nowPos >= 2.091f && nowPos < 2.4f) { leftHandPos.x = 0.5f; leftHandPos.y = 4.3f; rightFootPos.y = 3.316f; rightHandPos.x = -0.4f; rightHandPos.y = 4.3f; leftFootPos.y = 2.816f; rightHandPos.z = climbTheLadder.GetRightHandBase().z; leftHandPos.z = climbTheLadder.GetLeftHandBase().z; } else if (nowPos >= 2.4f && nowPos < 2.8f) { leftHandPos.x = 0.5f; leftHandPos.y = 4.3f; rightFootPos.y = 3.316f; rightHandPos.x = -0.4f; rightHandPos.y = 4.3f; leftFootPos.y = 3.816f; rightHandPos.z = -0.5f; leftHandPos.z = -0.5f; } rightHandTra.localPosition = rightHandPos; leftHandTra.localPosition = leftHandPos; rightFootTra.localPosition = rightFootPos; leftFootTra.localPosition = leftFootPos; // 膝の向きを設定 rightKneeTra.localPosition = new Vector3 (rightKneeTra.localPosition.x, climbTheLadder.GetRightKneeBase().y + transform.position.y, rightKneeTra.localPosition.z); leftKneeTra.localPosition = new Vector3 (leftKneeTra.localPosition.x, climbTheLadder.GetLeftKneeBase().y + transform.position.y, leftKneeTra.localPosition.z); } // はしごの上り下りは重力を if (state != State.Stairs) { velocity.y += Physics.gravity.y * Time.deltaTime; } cCon.Move (velocity * Time.deltaTime); } |
キャラクターがNormal状態の時は通常の移動処理です。
Stairs状態の時はZ軸座標の動きだけをvelocity(速度)に足していく事にします。
nowPosはキャラクターの位置と元々の位置とのY座標の差を入れます。
その差によってRightHandやLeftHandの位置を変更していきます。
設定する数値は実行しながら値を変更し、細かく設定していく必要があります。
最初の位置はClimbTheLadderスクリプトが保持しているベースの値を設定し、そこから上に昇っていくにつれて値を変更しています。
膝の位置はキャラクターが上に登っていくのと共に上げていけばいいだけです。
はしごの上り下りをしている時は重力を働かせたくない為、State.Stairs以外の時だけ重力値をvelocityに加えています。
手や足の位置を設定する処理部分
次にUpdateメソッドで移動させたRightHandやLeftHandの位置に手や足の位置を持っていく処理部分を記述します。
1 2 3 4 5 6 7 8 9 10 11 12 13 14 15 16 17 18 19 20 21 22 23 24 25 26 27 28 29 30 31 | void OnAnimatorIK() { if(isStairs) { animator.SetIKPositionWeight(AvatarIKGoal.RightHand, weight); animator.SetIKPositionWeight(AvatarIKGoal.LeftHand, weight); animator.SetIKPositionWeight(AvatarIKGoal.RightFoot, weight); animator.SetIKPositionWeight(AvatarIKGoal.LeftFoot, weight); animator.SetIKRotationWeight(AvatarIKGoal.RightHand, weight); animator.SetIKRotationWeight(AvatarIKGoal.LeftHand, weight); animator.SetIKRotationWeight(AvatarIKGoal.RightFoot, weight); animator.SetIKRotationWeight(AvatarIKGoal.LeftFoot, weight); animator.SetIKHintPositionWeight (AvatarIKHint.RightKnee, weight); animator.SetIKHintPositionWeight (AvatarIKHint.LeftKnee, weight); animator.SetIKPosition(AvatarIKGoal.RightHand, rightHandTra.position); animator.SetIKPosition(AvatarIKGoal.LeftHand, leftHandTra.position); animator.SetIKPosition(AvatarIKGoal.RightFoot, rightFootTra.position); animator.SetIKPosition(AvatarIKGoal.LeftFoot, leftFootTra.position); animator.SetIKRotation(AvatarIKGoal.RightHand, rightHandTra.rotation); animator.SetIKRotation(AvatarIKGoal.LeftHand, leftHandTra.rotation); animator.SetIKRotation(AvatarIKGoal.RightFoot, rightFootTra.rotation); animator.SetIKRotation(AvatarIKGoal.LeftFoot, leftFootTra.rotation); animator.SetIKHintPosition (AvatarIKHint.RightKnee, rightKneeTra.position); animator.SetIKHintPosition (AvatarIKHint.LeftKnee, leftKneeTra.position); } } |
AnimatorControllerのLayersの歯車をクリックしIK Passにチェックを入れるとOnAnimatorIKメソッドが呼ばれるようになります。
isStairsがtrueの時にIKのウエイトを設定し、位置や角度がrightHandTraやleftHandTraの位置や角度となるようにします。
その他の処理
その他の状態変更メソッド等を作成します。
1 2 3 4 5 6 7 8 9 10 11 12 13 14 15 16 17 18 19 20 21 22 23 24 25 26 27 28 29 30 31 32 33 34 35 36 37 38 39 40 41 42 43 44 45 46 | public void SetState(State mode) { state = mode; if (state == State.Stairs) { velocity = Vector3.zero; animator.SetFloat ("Speed", 0f); } } public State GetState() { return state; } public void SetStairs(ClimbTheLadder climbTheLadder) { this.climbTheLadder = climbTheLadder; rightHandTra = climbTheLadder.GetRightHandTra(); leftHandTra = climbTheLadder.GetLeftHandTra(); rightFootTra = climbTheLadder.GetRightFootTra(); leftFootTra = climbTheLadder.GetLeftFootTra(); rightKneeTra = climbTheLadder.GetRightKneeTra(); leftKneeTra = climbTheLadder.GetLeftKneeTra(); transform.position = climbTheLadder.GetStandPosition().position; transform.rotation = climbTheLadder.GetStandPosition().rotation; SetState(State.Stairs); animator.SetBool("Stairs", true); basePositionY = transform.position.y; isStairs = true; } public bool IsStairs() { return isStairs; } public void ResetStairs() { isStairs = false; rightHandTra = null; leftHandTra = null; rightFootTra = null; leftFootTra = null; rightKneeTra = null; leftKneeTra = null; SetState(State.Normal); animator.SetBool("Stairs", false); } |
SetStairsメソッドはClimbTheLadderスクリプトから呼び出されるメソッドでキャラクター操作スクリプト側で右手や左手のTransformを操作する為にTransformを取得しています。
EndAreaの作成
EndAreaはキャラクターがはしごを登り切ったとする範囲です。
Box Colliderを取り付けIs Triggerにチェックを入れます。
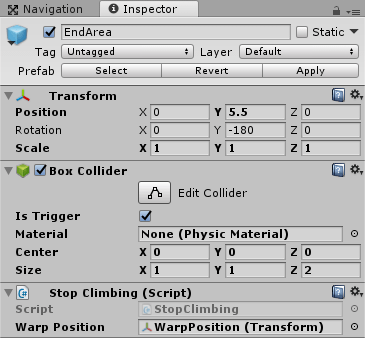
EndAreaにはStopClimbingスクリプトを作成し取り付けます。
1 2 3 4 5 6 7 8 9 10 11 12 13 14 15 16 17 18 19 20 21 22 23 24 | using System.Collections; using System.Collections.Generic; using UnityEngine; public class StopClimbing : MonoBehaviour { private StairChara stairChara; [SerializeField] private Transform warpPosition; void OnTriggerEnter(Collider col) { if (col.tag == "Player") { stairChara = col.GetComponent<StairChara> (); if (stairChara.IsStairs ()) { stairChara.ResetStairs (); transform.parent.GetComponentInChildren<ClimbTheLadder> ().ResetStairs (); col.transform.position = warpPosition.position; } } } } |
キャラクターが検知エリアに侵入したらキャラクターを通常状態にし、warpPositionの位置に移動させます。
warpPositionははしごを登り切った後の地面がある部分に移動させておきます。
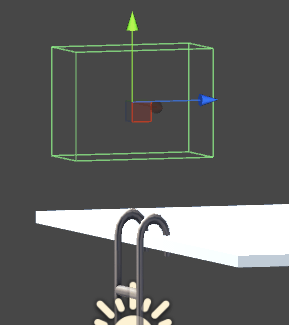
これではしごを昇っている状態の時だけ↑↓のキーだけに反応して動くキャラクターになります。
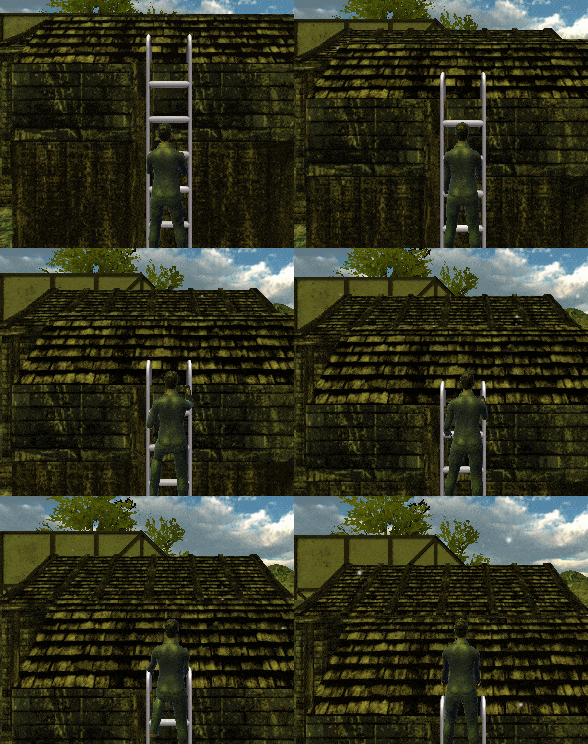
上のようになりました。
細かく調整はしていないので近くで見るとはしごに手足が食い込んでいる可能性もあります。(^_^;)
手足の移動をなめらかにする処理
はしごを登る時に一定の範囲に来たらすぐに目的の位置へ手や足を移動させていますが、
目的の位置まで滑らかにアニメーションしたい方もいると思います。
その為の処理をStairCharaスクリプトに追加します。
まずは宣言部です。
1 2 3 4 5 6 7 8 | // 梯子に上る時にスムーズに移行すさせるかどうか [SerializeField] private bool stairSmoothFlag; // スムーズ値 [SerializeField] private float stairSmoothValue = 10f; |
stairSmoothFlagはスムーズに手や足の位置を変更させるかどうかで、stairSmoothValueはスムーズ値です。
次にUpdateメソッドに滑らかに移動する為の処理に改造します。
膝の向きを設定する処理の上のRightHandTra等のローカル位置を変更している部分を変更します。
1 2 3 4 5 6 7 8 9 10 11 12 13 14 | if (stairSmoothFlag) { rightHandTra.localPosition = Vector3.Lerp (rightHandTra.localPosition, rightHandPos, stairSmoothValue * Time.deltaTime); leftHandTra.localPosition = Vector3.Lerp (leftHandTra.localPosition, leftHandPos, stairSmoothValue * Time.deltaTime); rightFootTra.localPosition = Vector3.Lerp (rightFootTra.localPosition, rightFootPos, stairSmoothValue * Time.deltaTime); leftFootTra.localPosition = Vector3.Lerp (leftFootTra.localPosition, leftFootPos, stairSmoothValue * Time.deltaTime); } else { rightHandTra.localPosition = rightHandPos; leftHandTra.localPosition = leftHandPos; rightFootTra.localPosition = rightFootPos; leftFootTra.localPosition = leftFootPos; } |
↑のような感じでスムーズ処理をするかしないかで処理を分けます。
処理が完成したので、インスペクタでstairSmoothFlagのチェックを入れ、stairSmoothValueに値(今回は8を設定)を設定してください。
Unityの実行ボタンを押して確認してみましょう。
一気に駆け上がろうとすると目的地に手や足が来る前に次の目的地が設定されてしまう為動きがぎこちない感じになってます。
Y座標の移動値を少なくしたり、stairSmoothValueの値を大きくするとぎこちなさは取れます。
もっといい方法はないもんですかねぇ・・・・
スムーズにやらない方がよく見えるような気もします・・・・(^_^;)
終わりに
IKを使って簡易的にはしごを登らせる処理を作りましたが、改良の余地はありそうですね。
キャラクターのはしごを登るアニメーションをちゃんと作っているならターゲットマッチングを使うともっとちゃんとしたのが作れるかも?

