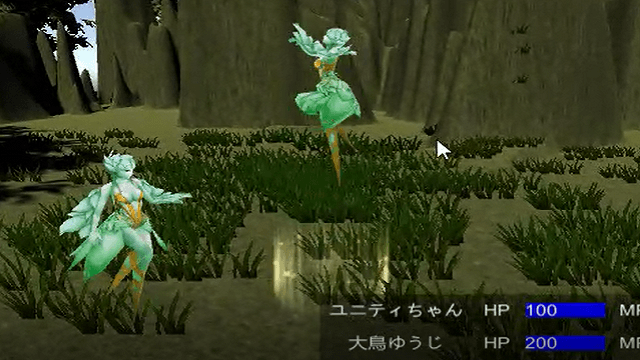
今回は戦闘中のダメージや回復ポイントをキャラクターの近くにTextMeshProを使って表示し、テキストがアニメーションをするようにします。
前回は戦闘中に選択されたキャラクターの上にアイコンを表示する機能を作成しました。

ユニティちゃんのRPGを作ってみようの他の記事は
から見ることが出来ます。
戦闘中に攻撃や回復アイテム等を使った時に相手のCharacterBattleScriptのHPを操作する機能は作りました。
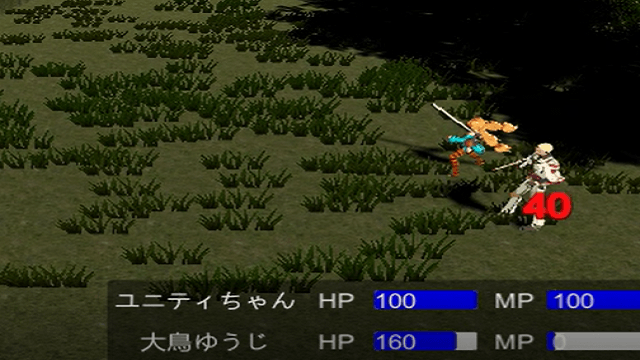
今回はその攻撃をした時に与えたダメージや回復魔法やアイテムを使って回復したHPの量を見てすぐわかるようにキャラクターの近くに表示します。
テキストは今まで使っていたTextではなくTextMeshProを使って表示し、テキストにアニメーションをさせるようにします。
TextMeshProを使う
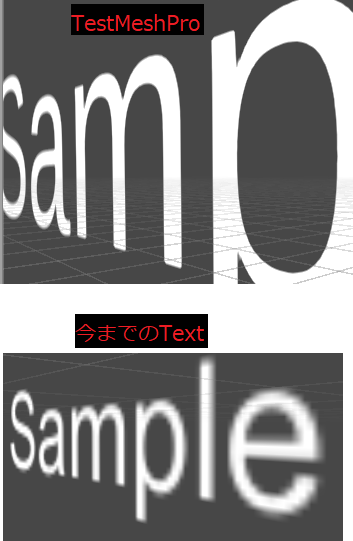
今回の記事では今まで使っていたTextではなくTextMeshProを使用したいと思います。
TextMeshProはテキストをメッシュとして取り扱う事が出来、今まで使ってきたTextと違いカメラが接写しても文字がにじみにくいです。
その他TextMeshProでは設定を変更する事で簡単に綺麗なタイトルロゴの作成等が出来ます。
今までのTextだとCanvasの子要素に配置してCanvas上の位置を設定するかCanvasのRender ModeをWorld Spaceにして通常のゲームオブジェクトと同じ扱いをすることが出来ました。
TextMeshProを使ってもCanvasの子要素に配置したり(InputFieldやButton、DropdownのテキストもTextMeshProに出来ます)、通常のゲームオブジェクトとしてテキストを作ることも出来ます。
新しめのUnityのバージョンであればTextMeshProは既にエディターに入っているので、使用する時に必要な他のファイルをインポートして使うだけです。
UnityメニューのWindowからTextMeshPro→Import TMP Essential ResourcesとImport TMP Examples and Extrasを選択しそれぞれインポートします。
TMP Essential Resourcesはフォント等のデータ、TMP Examples and ExtrasはTextMeshProを使ったサンプルが入っています。
ダメージと回復ポイント用のTextMeshProの作成
TextMeshProが使えるようになったのでダメージと回復用のTextMeshProを作成していきます。
Font Assetの作成
TextMeshProで使用するFont Assetを作成します。
Font Assetを作成するには元となるフォントファイルが必要になります。
今回は日本語は使わないのでTMP Essential Resourcesをインポートしてついてきたフォントを元にFont Assetファイルを作成します。
Assets/TextMesh Pro/Fonts/LiberationSans.ttfを選択した状態で右クリックからCreate→TextMeshPro→Font Assetを選択し、名前をDamageSDFとします。
DamageSDFを選択しインスペクタのGeneration SettingsのSource Font FileにLiberationSans.ttfを設定します。
DamageSDFをAssets/TextMesh Pro/Resources/Fonts & Materialsに移動させます。
DamageSDFを選択した状態でCtrl+Dキーをおして複製し、名前をHealingSDFとします。
Font Assetのマテリアルの設定
Font Assetが出来たのでそのFont Assetのマテリアルを設定します。
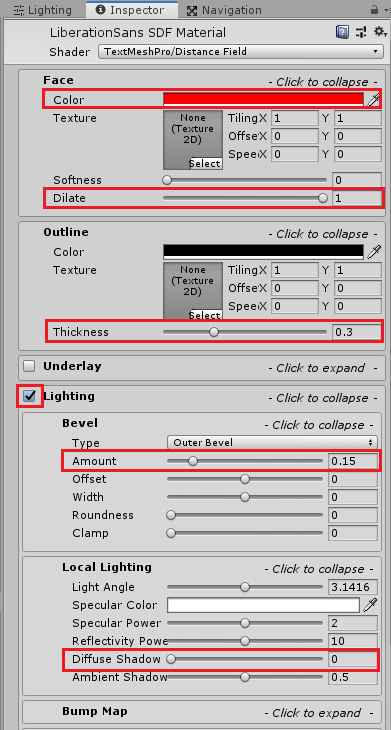
DamageSDFの子要素のLiberationSansSDFMaterialを選択します。
DamageSDFの子要素のLiberationSansSDFMateriarlのインスペクタのShaderがTextMeshPro/Distance FieldとなっていなければTextMeshPro/Distance Fieldに変更します。
FaceのColorを赤色にし、Dilateを1、OutlineのThicknessを0.3、Lightingにチェックを入れBevelのAmountを0.15にします。
Local LightingのDifuse Shadowを0にします。
HealingSDFの子要素のLiberationSansSDFMaterialのインスペクタも同じように設定し、FaceのColorだけ青色にします。
これでFont Assetのマテリアルの設定が終わりました。
TextMeshProの作成
ヒエラルキー上で右クリックから3D Object→Text- TextMeshProを選択し、名前をDamageTextProとします。
DamageTextProのインスペクタのTextMeshProのMain SettingsのFont AssetにDamageSDFを設定します。
MeshRendererのMaterialsのElement0にDamageSDFのマテリアルが設定されていなければDamageSDFのマテリアルを設定します。
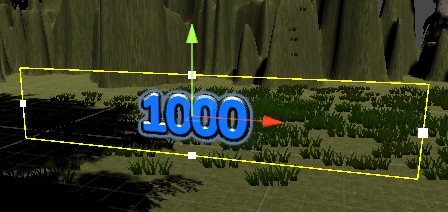
RectTransformのWidthを5、Heightを1、TextMeshProのFont Sizeを6、Alignmentを真ん中にします。
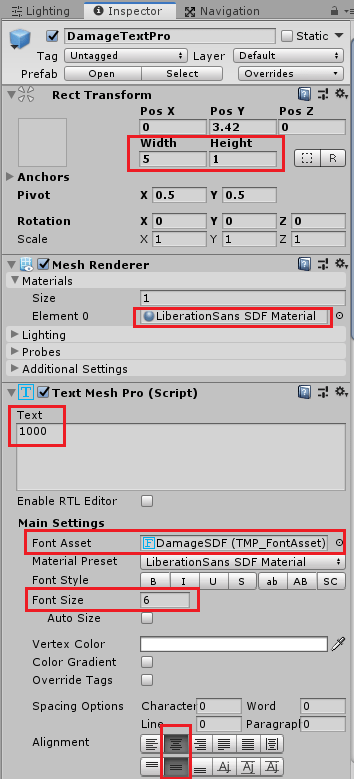
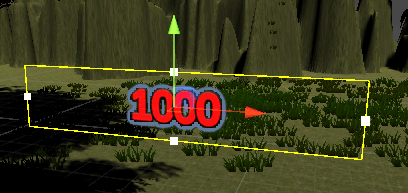
これで以下のようになりました。
ヒエラルキー上のDamageTextProゲームオブジェクトを選択し、Ctrl+Dキーで複製し、名前をHealingTextProとします。
HealingTextProのFont AssetをHealingTextProにし、MaterialsのElement0にHealingSDFの子要素のマテリアルを設定します。
HealingTextProは以下のようになりました。
ここまで出来たらヒエラルキー上のDamageTextProとHealingTextProをAssets/RPG/Prefabs/UI/BattleCommandフォルダにドラッグ&ドロップしてプレハブにします。
ヒエラルキー上のDamageTextProとHealingTextProは使わないので削除します。
テキストのアニメーションを作成する
ダメージや回復ポイント用のテキストプレハブが出来たので後はダメージを与えた時や回復した時に対応するテキストプレハブに値を設定してインスタンス化するだけです。
ですがテキストがそのまま表示されるだけだと印象に残らないので、テキスト一文字ずつアニメーションを付ける事にします。
アニメーションはスクリプトから一文字の作成に使われているvertex(頂点)を移動して行う事にします。
アニメーションをさせるスクリプトはImport TMP Examples and ExtrasでインポートしたファイルにあったAssets/TextMesh Pro/Examples and Extras/Scripts/VertexJitterスクリプトを元に作ります。
VertexJitterスクリプトではコルーチンを使ってアニメーションをさせていましたが、Updateメソッドを使ってアニメーションさせるように変更しました。
Assets/RPG/Scripts/Battleフォルダに新しくRaiseAndLowerTextAnimationScriptを作成します。
今回作成するアニメーションは大きい桁の数字から上に上がって一定の高さになったら下に戻り、下に戻ったら次の文字が上がって下がるというアニメーションをさせます。
スクリプトが長いので分割して説明します。
クラス定義、フィールド、初期化などのメソッド
まずはクラス定義やフィールド、初期化などを行っているメソッドを見ていきます。
1 2 3 4 5 6 7 8 9 10 11 12 13 14 15 16 17 18 19 20 21 22 23 24 25 26 27 28 29 30 31 32 33 34 35 36 37 38 39 40 41 42 43 44 45 46 47 48 | using UnityEngine; using System.Collections; using TMPro; public class RaiseAndLowerTextAnimationScript : MonoBehaviour { // 目的のYの値 [SerializeField] private float destinationYValue = 0.5f; // 文字の移動スピード [SerializeField] private float charSpeed = 5f; private TMP_Text m_TextComponent; private bool hasTextChanged; private VertexAnim[] vertexAnims; private TMP_TextInfo textInfo; private CharacterAnim[] characterAnims; private TMP_MeshInfo[] cachedMeshInfo; private TMP_CharacterInfo charInfo; // 頂点用構造体 private struct VertexAnim { public float yValue; } // 文字毎の構造体 private struct CharacterAnim { public bool isAnimationStart; public bool isAnimationEnd; public bool isFlap; } void Awake() { m_TextComponent = GetComponent<TMP_Text>(); } void OnEnable() { // Subscribe to event fired when text object has been regenerated. TMPro_EventManager.TEXT_CHANGED_EVENT.Add(ON_TEXT_CHANGED); } void OnDisable() { TMPro_EventManager.TEXT_CHANGED_EVENT.Remove(ON_TEXT_CHANGED); } } |
destinationYValueはテキストが上にどれだけ上がるかの距離を設定します。
charSpeedは文字が移動する速さを設定します。
m_TextComponentはTMP_Textを入れます。
hasTextChangedは元々のスクリプトで使っていたもので、よくわかりませんが、trueの時にTMP_Meshinfoのコピーを生成するようです。
vertexAnimsは個々の頂点の構造体データを入れます。
textInfoは個々の文字のテキスト情報を入れます。
characterAnimsは個々の文字の構造体データを入れます。
VertexAnim構造体は個々の頂点のYの位置を入れる事が出来るようにします。
CharacterAnim構造体はisAnimationStartはアニメーションが開始しているか?、isAnimationEndはアニメーションが終了したか?、isFlapは上に行ききって反転したかを入れます。
構造体はクラスと同じように使えますが、構造体の変数やフィールドには実体が入ります。
クラスの場合は変数やフィールドには実体の場所を指し示す参照値が入っています。
なので構造体をメソッド等の引数に渡す時は受け取り側の構造体の引数にも実態が渡される為メモリを使うようです。
Awake、OnEnable、OnDisableは元々のスクリプトにあったもので何をしているのかはよくわかりません。
StartメソッドとON_TEXT_CHANGEDメソッド
次にStartメソッドとON_TEXT_CHANGEDメソッドを見ていきます。
1 2 3 4 5 6 7 8 9 10 11 12 13 14 15 16 17 18 19 20 21 22 23 24 25 26 27 28 29 30 31 32 33 34 35 | void Start() { // ないとエラーになる m_TextComponent.ForceMeshUpdate(); textInfo = m_TextComponent.textInfo; hasTextChanged = true; // 文字に使っている頂点用データの作成 vertexAnims = new VertexAnim[textInfo.characterCount * 4]; // 文字毎のデータ作成 characterAnims = new CharacterAnim[textInfo.characterCount]; // 最初の文字のアニメーションをスタートさせる characterAnims[0].isAnimationStart = true; // Cache the vertex data of the text object as the Jitter FX is applied to the original position of the characters. cachedMeshInfo = textInfo.CopyMeshInfoVertexData(); // Get new copy of vertex data if the text has changed. if (hasTextChanged) { // Update the copy of the vertex data for the text object. cachedMeshInfo = textInfo.CopyMeshInfoVertexData(); hasTextChanged = false; } } void ON_TEXT_CHANGED(Object obj) { if (obj == m_TextComponent) hasTextChanged = true; } |
m_TextComponent.ForceMeshUpdate()で一旦強制でメッシュのアップデートを行わないとその後のTextMeshProからデータを取る時にエラーが出る為呼び出します。
テキストの一文字は4つの頂点から作られているのでtextInfo.characterCountで文字数を取得しそれに4をかけた数字分の頂点データが必要になります。
その分のVertexAnimを作成しvertexAnimに入れています。
characterAnimは文字毎のデータなので文字数分のデータを確保します。
characterAnim[0]で最初の文字の構造体データを取得しisAnimationStartをtrueにして最初の文字のアニメーションをスタートさせます。
cachedMeshInfo = textInfo.CopyMeshInfoVertexData()は元々のスクリプトにあったものでMesh情報の頂点データを複製していると思われます。
ON_TEXT_CHANGEDメソッドも元々のスクリプトにあったものです。
Updateメソッド
Updateメソッドを作成します。
1 2 3 4 5 6 7 8 9 10 11 12 13 14 15 16 17 18 19 20 21 22 23 24 25 26 27 28 29 30 31 32 33 34 35 36 37 38 39 40 41 42 43 44 45 46 47 48 49 50 51 52 53 54 55 56 57 58 59 60 61 62 63 64 65 66 67 68 69 70 71 72 73 74 75 76 77 78 79 80 81 82 83 84 85 86 87 88 89 90 91 92 93 94 95 96 97 98 99 100 101 102 103 104 105 106 107 108 109 110 111 112 113 114 115 116 117 118 119 120 121 122 123 | private void Update() { m_TextComponent.ForceMeshUpdate(); Matrix4x4 matrix; int characterCount = textInfo.characterCount; // If No Characters then just yield and wait for some text to be added if (characterCount == 0) { return; } // 使用する変数宣言 Vector3[] charOffset = new Vector3[characterCount]; int materialIndex; int vertexIndex; Vector3[] sourceVertices; Vector2 charMidBasline; Vector3 offset; Vector3[] destinationVertices; for (int i = 0; i < characterCount; i++) { // その文字のアニメーションがスタートしてなければ次の文字 if (!characterAnims[i].isAnimationStart) { continue; } // その文字のアニメーションが終わっていれば次の文字 if (characterAnims[i].isAnimationEnd) { continue; } charInfo = textInfo.characterInfo[i]; // 文字が見えなければ(空白文字)次の文字をアニメーションさせる if (!charInfo.isVisible) { characterAnims[i].isAnimationStart = false; characterAnims[i].isAnimationEnd = true; // 最後の文字まで進んでいなければ次の文字をスタートさせる if (i < characterCount - 1) { characterAnims[i + 1].isAnimationStart = true; } else { // 最後の文字が終わっていればゲームオブジェクトを1秒後に削除 Destroy(this.gameObject, 1f); } continue; } // Get the index of the material used by the current character. materialIndex = textInfo.characterInfo[i].materialReferenceIndex; // Get the index of the first vertex used by this text element. vertexIndex = textInfo.characterInfo[i].vertexIndex; // Get the cached vertices of the mesh used by this text element (character or sprite). sourceVertices = cachedMeshInfo[materialIndex].vertices; // Determine the center point of each character at the baseline. //charMidBasline = new Vector2((sourceVertices[vertexIndex + 0].x + sourceVertices[vertexIndex + 2].x) / 2, charInfo.baseLine); // Determine the center point of each character. charMidBasline = (sourceVertices[vertexIndex + 0] + sourceVertices[vertexIndex + 2]) / 2; // Need to translate all 4 vertices of each quad to aligned with middle of character / baseline. // This is needed so the matrix TRS is applied at the origin for each character. offset = charMidBasline; destinationVertices = textInfo.meshInfo[materialIndex].vertices; destinationVertices[vertexIndex + 0] = sourceVertices[vertexIndex + 0] - offset; destinationVertices[vertexIndex + 1] = sourceVertices[vertexIndex + 1] - offset; destinationVertices[vertexIndex + 2] = sourceVertices[vertexIndex + 2] - offset; destinationVertices[vertexIndex + 3] = sourceVertices[vertexIndex + 3] - offset; // 文字が上まで行っていない時は上に移動 if (!characterAnims[i].isFlap) { charOffset[i] = new Vector3(0f, Mathf.MoveTowards(vertexAnims[i].yValue, destinationYValue, charSpeed * Time.deltaTime), 0f); vertexAnims[i].yValue = charOffset[i].y; Debug.Log(vertexAnims[i].yValue); // 目的地を越えたら反転 if (charOffset[i].y >= destinationYValue) { characterAnims[i].isFlap = true; } } else { charOffset[i] = new Vector3(0f, Mathf.MoveTowards(vertexAnims[i].yValue, 0f, charSpeed * Time.deltaTime), 0f); vertexAnims[i].yValue = charOffset[i].y; // 文字が元の位置に戻ったら次の文字をスタート if (vertexAnims[i].yValue <= 0f) { characterAnims[i].isAnimationStart = false; characterAnims[i].isAnimationEnd = true; // 最後の文字でなければ次の文字をスタート if (i < characterCount - 1) { characterAnims[i + 1].isAnimationStart = true; } else { // 最後の文字であればゲームオブジェクトを1秒後に削除 Destroy(this.gameObject, 1f); } } } // 位置、回転、スケールから行列を作成 matrix = Matrix4x4.TRS(charOffset[i], Quaternion.identity, Vector3.one); // 引数で与えた頂点をmatrix変換行列に従って変換 destinationVertices[vertexIndex + 0] = matrix.MultiplyPoint3x4(destinationVertices[vertexIndex + 0]); destinationVertices[vertexIndex + 1] = matrix.MultiplyPoint3x4(destinationVertices[vertexIndex + 1]); destinationVertices[vertexIndex + 2] = matrix.MultiplyPoint3x4(destinationVertices[vertexIndex + 2]); destinationVertices[vertexIndex + 3] = matrix.MultiplyPoint3x4(destinationVertices[vertexIndex + 3]); destinationVertices[vertexIndex + 0] += offset; destinationVertices[vertexIndex + 1] += offset; destinationVertices[vertexIndex + 2] += offset; destinationVertices[vertexIndex + 3] += offset; } // Push changes into meshes for (int i = 0; i < textInfo.meshInfo.Length; i++) { textInfo.meshInfo[i].mesh.vertices = textInfo.meshInfo[i].vertices; m_TextComponent.UpdateGeometry(textInfo.meshInfo[i].mesh, i); } } |
m_TextComponent.ForceMeshUpdate()で最初にテキストのメッシュをアップデートします。
characterCountが0、つまりテキストに一文字もなければreturnでその後の処理をしません。
1 2 3 | Vector3[] charOffset = new Vector3[characterCount]; |
で文字数分のcharOffsetのVector3の配列を作成します。
その後for文で文字数分の繰り返しを行います。
その文字のisAnimationStartがfalseの時(その文字のアニメーションがスタートしていない時)、isAnimationEndがtrueの時(その文字のアニメーションが終了している時)はcontinueで次の文字に回します。
1 2 3 4 5 6 7 8 9 10 11 12 13 14 15 16 | // 文字が見えなければ(空白文字)次の文字をアニメーションさせる if (!charInfo.isVisible) { characterAnims[i].isAnimationStart = false; characterAnims[i].isAnimationEnd = true; // 最後の文字まで進んでいなければ次の文字をスタートさせる if (i < characterCount - 1) { characterAnims[i + 1].isAnimationStart = true; } else { // 最後の文字が終わっていればゲームオブジェクトを1秒後に削除 Destroy(this.gameObject, 1f); } continue; } |
!charInfo.isVisibleでその文字が見えない(空白文字等)時はその文字の構造体データのisAnimationStartをfalseにし、isAnimationEndをtrueにし次の文字のアニメーションに移ります。
最後の文字まで進んでいなければ次の文字のisAnimationStartをtrueにします。
最後の文字であればこのスクリプトが設定されているゲームオブジェクトを1秒後に削除します。
1 2 3 4 5 6 7 8 9 10 11 12 13 14 15 16 17 18 19 20 21 22 23 24 25 26 | // Get the index of the material used by the current character. materialIndex = textInfo.characterInfo[i].materialReferenceIndex; // Get the index of the first vertex used by this text element. int vertexIndex = textInfo.characterInfo[i].vertexIndex; // Get the cached vertices of the mesh used by this text element (character or sprite). sourceVertices = cachedMeshInfo[materialIndex].vertices; // Determine the center point of each character at the baseline. //charMidBasline = new Vector2((sourceVertices[vertexIndex + 0].x + sourceVertices[vertexIndex + 2].x) / 2, charInfo.baseLine); // Determine the center point of each character. charMidBasline = (sourceVertices[vertexIndex + 0] + sourceVertices[vertexIndex + 2]) / 2; // Need to translate all 4 vertices of each quad to aligned with middle of character / baseline. // This is needed so the matrix TRS is applied at the origin for each character. offset = charMidBasline; destinationVertices = textInfo.meshInfo[materialIndex].vertices; destinationVertices[vertexIndex + 0] = sourceVertices[vertexIndex + 0] - offset; destinationVertices[vertexIndex + 1] = sourceVertices[vertexIndex + 1] - offset; destinationVertices[vertexIndex + 2] = sourceVertices[vertexIndex + 2] - offset; destinationVertices[vertexIndex + 3] = sourceVertices[vertexIndex + 3] - offset; |
の部分は元々のスクリプトにあったものでマテリアルのインデックス、頂点のインデックスの取得をして、頂点から文字の真ん中の位置を取得しています。
その文字を作っている4つの頂点に元のデータにオフセット値を加えたものを入れています。
1 2 3 4 5 6 7 8 9 10 11 12 13 14 15 16 17 18 19 20 21 22 23 24 25 26 | // 文字が上まで行っていない時は上に移動 if (!characterAnims[i].isFlap) { charOffset[i] = new Vector3(0f, Mathf.MoveTowards(vertexAnims[i].yValue, destinationYValue, charSpeed * Time.deltaTime), 0f); vertexAnims[i].yValue = charOffset[i].y; // 目的地を越えたら反転 if (charOffset[i].y >= destinationYValue) { characterAnims[i].isFlap = true; } } else { charOffset[i] = new Vector3(0f, Mathf.MoveTowards(vertexAnims[i].yValue, 0f, charSpeed * Time.deltaTime), 0f); vertexAnims[i].yValue = charOffset[i].y; // 文字が元の位置に戻ったら次の文字をスタート if (vertexAnims[i].yValue <= 0f) { characterAnims[i].isAnimationStart = false; characterAnims[i].isAnimationEnd = true; // 最後の文字でなければ次の文字をスタート if (i < characterCount - 1) { characterAnims[i + 1].isAnimationStart = true; } else { // 最後の文字であればゲームオブジェクトを1秒後に削除 Destroy(this.gameObject, 1f); } } } |
その文字の構造体データのisFlapがfalseの時(文字が上に移動している時)はMathf.MoveTowardsメソッドを使って現在のYの位置からdestinationYValueの値にcharSpeed * Time.deltaTimeのスピードで移動させます。
求めた値はその頂点の構造体データのyValueに入れて置き次にここに来た時に使用します。
目的地を超えたらその文字の構造体データのisFlapをtrueにして下向きに移動させるようにします。
下向きの場合は現在のYの値から0にcharSpeed * Time.deltaTimeのスピードで移動させます。
目的地を超えたらこの文字は終了し、次の文字のアニメーションへ移行させます。
1 2 3 4 5 6 7 8 9 10 11 12 13 14 | // 位置、回転、スケールから行列を作成 matrix = Matrix4x4.TRS(charOffset[i], Quaternion.identity, Vector3.one); // 引数で与えた頂点をmatrix変換行列に従って変換 destinationVertices[vertexIndex + 0] = matrix.MultiplyPoint3x4(destinationVertices[vertexIndex + 0]); destinationVertices[vertexIndex + 1] = matrix.MultiplyPoint3x4(destinationVertices[vertexIndex + 1]); destinationVertices[vertexIndex + 2] = matrix.MultiplyPoint3x4(destinationVertices[vertexIndex + 2]); destinationVertices[vertexIndex + 3] = matrix.MultiplyPoint3x4(destinationVertices[vertexIndex + 3]); destinationVertices[vertexIndex + 0] += offset; destinationVertices[vertexIndex + 1] += offset; destinationVertices[vertexIndex + 2] += offset; destinationVertices[vertexIndex + 3] += offset; |
Matrix4×4.TRSメソッドは位置、回転、スケールから行列を求められます。
vertexIndexはその文字の最初の頂点の番号でそれに0~3を足すことでこの文字を形成している4つの頂点を表すことが出来ます。
matrix.MultiplyPoint3x4(destinationVertices[vertexIndex + 0])で作成した変換行列(matrix)を使って引数で与えた頂点の位置を変換します。
1 2 3 4 5 6 7 | // Push changes into meshes for (int i = 0; i < textInfo.meshInfo.Length; i++) { textInfo.meshInfo[i].mesh.vertices = textInfo.meshInfo[i].vertices; m_TextComponent.UpdateGeometry(textInfo.meshInfo[i].mesh, i); } |
最後に頂点を更新しています。
これも元々のスクリプトにあったものなのでよくわかりません。
Updateメソッド内でfor文を使って全部の文字を繰り返ししてisAnimationStartがtrueの文字だけをアニメーションさせています。
ですが結局アニメーションさせる文字は最初の文字から一文字ずつをアニメーションさせるのでfor文を使わずにcharNum等の文字のインデックスを使って処理をすることも出来ます。
ただこの場合は文字を切り替えた後に一旦次のUpdateメソッドが呼ばれるまで次の文字がアニメーションをしません。
なので文字の切り替わりが断絶されたような感じでスムーズなアニメーションにならないのでfor文を使って処理をしています。
これでスクリプトが出来たのでDamageTextProプレハブとHealingTextProプレハブに取り付けます。
攻撃や回復をした時にDamageTextProやHealingTextProのインスタンス化をして表示する
ダメージ用のテキストDamageTextProと回復用のテキストHealingTextProが出来たのでそれらを攻撃や回復した時にインスタンス化して表示するようにします。
ポイント表示用スクリプトの作成
ダメージや回復ポイントを表示させるスクリプトを作成します。
Assets/RPG/Scripts/Battleフォルダに新しくEffectNumericalDisplayScriptスクリプトを作成し、BattleManagerゲームオブジェクトに取り付けます。
1 2 3 4 5 6 7 8 9 10 11 12 13 14 15 16 17 18 19 20 21 22 23 24 25 26 27 28 29 30 31 32 33 34 35 36 | using System.Collections; using System.Collections.Generic; using TMPro; using UnityEngine; public class EffectNumericalDisplayScript : MonoBehaviour { public enum NumberType { Damage, Healing } // ダメージポイント表示用プレハブ [SerializeField] private GameObject damagePointText; // 回復ポイント表示用プレハブ [SerializeField] private GameObject healingPointText; // ポイントの表示オフセット値 [SerializeField] private Vector3 offset = new Vector3(0f, 0.8f, -0.5f); public void InstantiatePointText(NumberType numberType, Transform target, int point) { var rot = Quaternion.LookRotation(target.position - Camera.main.transform.position); if (numberType == NumberType.Damage) { var pointTextIns = Instantiate<GameObject>(damagePointText, target.position + offset, rot); pointTextIns.GetComponent<TextMeshPro>().text = point.ToString(); Destroy(pointTextIns, 3f); } else if(numberType == NumberType.Healing) { var pointTextIns = Instantiate<GameObject>(healingPointText, target.position + offset, rot); pointTextIns.GetComponent<TextMeshPro>().text = point.ToString(); Destroy(pointTextIns, 3f); } } } |
NumberTypeはダメージ用なのか?回復用なのかでインスタンス化するプレハブを変える時に使う列挙型です。
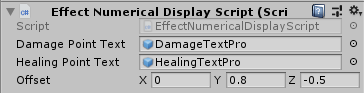
damagePointTextはダメージ用のプレハブ、healingPointTextは回復用のプレハブをインスペクタで設定します。
offsetはテキストを表示する位置のオフセット位置を設定します。
InstantiatePointTextメソッドは第1引数で受け取ったNumberTypeでインスタンス化するテキストプレハブを変化させます。
第2引数で攻撃等の対象者のゲームオブジェクト、第3引数でテキストに表示するダメージ数等を受け取ります。
Instantiateメソッドでインスタンス化していますが、第3引数でカメラの位置からターゲットの位置の方向の回転を指定して、カメラの向きに合わせてテキストの角度を合わせます。
Destroyで3秒後にインスタンス化したゲームオブジェクトを消していますが、正しく動作していればRaiseAndLowerTextAnimationScriptスクリプトで全部の文字のアニメーションが終了したら自動で削除されているので、この処理はいりません。
おまけとして残してありますけど・・・・( 一一)
BattleManagerのEffectNumericalDisplayScriptのインスペクタは以下のように設定します。
テキストをインスタンス化するメソッドの呼び出し
EffectNumericalDisplayScriptのInstantiatePointTextメソッドは攻撃や回復した時に呼び出して使用するので該当する場所で呼び出し処理を追加します。
CharacterBattleScriptスクリプトに処理を追加します。
フィールドを追加します。
1 2 3 4 | // 効果ポイント表示スクリプト private EffectNumericalDisplayScript effectNumericalDisplayScript; |
StartメソッドでbattleStatusScriptを取得している処理の下でEffectNumericalDisplayScriptを取得します。
1 2 3 4 5 6 7 8 9 10 11 | private void Start() { // その他処理 // コンポーネントの取得 battleManager = GameObject.Find("BattleManager").GetComponent<BattleManager>(); battleStatusScript = GameObject.Find("BattleUI/StatusPanel").GetComponent<BattleStatusScript>(); effectNumericalDisplayScript = battleManager.GetComponent<EffectNumericalDisplayScript>(); // その他処理 |
まずはDirectAttackメソッドの最後に追加します。
1 2 3 4 5 6 7 8 | public void DirectAttack() { // その他処理 Debug.Log(gameObject.name + "は" + currentTarget.name + "に" + currentSkill.GetKanjiName() + "をして" + damage + "を与えた。"); effectNumericalDisplayScript.InstantiatePointText(EffectNumericalDisplayScript.NumberType.Damage, currentTarget.transform, damage); } |
次はMagicAttackの最後です。
1 2 3 4 5 6 7 8 | public void MagicAttack() { // その他の処理 Debug.Log(gameObject.name + "は" + currentTarget.name + "に" + currentSkill.GetKanjiName() + "をして" + damage + "を与えた。"); effectNumericalDisplayScript.InstantiatePointText(EffectNumericalDisplayScript.NumberType.Damage, currentTarget.transform, damage); } |
UseMagicメソッドの回復をした時に処理を追加します。
1 2 3 4 5 6 7 8 9 10 11 12 13 14 15 16 17 18 19 20 | public void UseMagic() { // アニメーション状態を作ってなかったのでDamageにする currentTarget.GetComponent<Animator>().SetTrigger("Damage"); var magicType = ((Magic)currentSkill).GetSkillType(); if (magicType == Skill.Type.RecoveryMagic) { var recoveryPoint = ((Magic)currentSkill).GetMagicPower() + characterStatus.GetMagicPower(); if (targetCharacterStatus as AllyStatus != null) { targetCharacterBattleScript.SetHp(targetCharacterBattleScript.GetHp() + recoveryPoint); battleStatusScript.UpdateStatus(targetCharacterStatus, BattleStatusScript.Status.HP, targetCharacterBattleScript.GetHp()); } else { targetCharacterBattleScript.SetHp(GetHp() + recoveryPoint); } Debug.Log(gameObject.name + "は" + ((Magic)currentSkill).GetKanjiName() + "を使って" + currentTarget.name + "を" + recoveryPoint + "回復した。"); battleManager.ShowMessage(currentTarget.name + "を" + recoveryPoint + "回復した。"); effectNumericalDisplayScript.InstantiatePointText(EffectNumericalDisplayScript.NumberType.Healing, currentTarget.transform, recoveryPoint); // その他処理 |
UseItemメソッドのHPとMPの回復処理の所にメソッド呼び出しを追加します。
1 2 3 4 5 6 7 8 9 10 11 12 13 14 15 16 17 18 19 20 21 22 23 24 25 26 27 28 | public void UseItem() { currentTarget.GetComponent<Animator>().SetTrigger("Damage"); // キャラクターのアイテム数を減らす ((AllyStatus)characterStatus).SetItemNum(currentItem, ((AllyStatus)characterStatus).GetItemNum(currentItem) - 1); if (currentItem.GetItemType() == Item.Type.HPRecovery) { // 回復力 var recoveryPoint = currentItem.GetAmount(); targetCharacterBattleScript.SetHp(targetCharacterBattleScript.GetHp() + recoveryPoint); battleStatusScript.UpdateStatus(targetCharacterStatus, BattleStatusScript.Status.HP, targetCharacterBattleScript.GetHp()); Debug.Log(gameObject.name + "は" + currentItem.GetKanjiName() + "を使って" + currentTarget.name + "のHPを" + recoveryPoint + "回復した。"); battleManager.ShowMessage(currentTarget.name + "のHPを" + recoveryPoint + "回復した。"); effectNumericalDisplayScript.InstantiatePointText(EffectNumericalDisplayScript.NumberType.Healing, currentTarget.transform, recoveryPoint); } else if (currentItem.GetItemType() == Item.Type.MPRecovery) { // 回復力 var recoveryPoint = currentItem.GetAmount(); targetCharacterBattleScript.SetMp(targetCharacterBattleScript.GetMp() + recoveryPoint); battleStatusScript.UpdateStatus(targetCharacterStatus, BattleStatusScript.Status.MP, targetCharacterBattleScript.GetMp()); Debug.Log(gameObject.name + "は" + currentItem.GetKanjiName() + "を使って" + currentTarget.name + "のMPを" + recoveryPoint + "回復した。"); battleManager.ShowMessage(currentTarget.name + "のMPを" + recoveryPoint + "回復した。"); effectNumericalDisplayScript.InstantiatePointText(EffectNumericalDisplayScript.NumberType.Healing, currentTarget.transform, recoveryPoint); // その他処理 } |
これでメソッドの呼び出し処理の追加が終わりました。
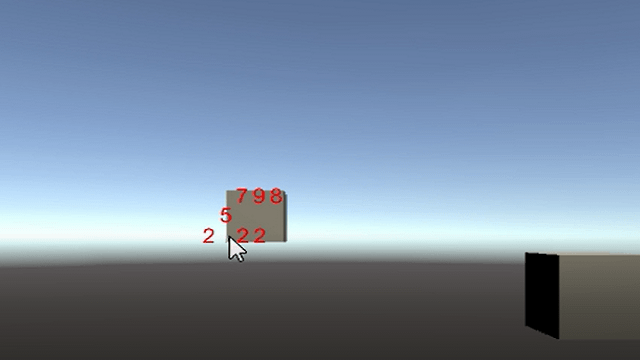
実際に戦闘をしてテキストが表示されアニメーションするかどうか確認してみましょう。
上のようになりました。
終わりに
与えたダメージ等をテキストを使ってキャラクターの近くに表示する事でより視覚的にわかりやすくなりましたね。
今回はスクリプトを使って一文字ずつアニメーションをさせているので少し難しい感じになっていますね。
TextやTextMeshProをAnimationウインドウでそれらを上下に移動させるアニメーションを作ってプレハブにし、
ダメージ数が1000だとしたら桁ごとにそのテキストのプレハブをインスタンス化して並べればスクリプトでアニメーションをさせない方法でも同じように出来ます。

この作品はユニティちゃんライセンス条項の元に提供されています