今回はUnityのInputSystem(プレビュー版)を使ったキャラクターの操作機能を作ってみます。
以前からInputManagerで設定したボタンを使ってキャラクターの移動機能を作ってきました。
しかし、入力システムは今後InputManagerをつかったものからInputSystemを使ったものに移行していくようなので、今回はキャラクターの移動をさせる時にInputSystemを使って移動させてみようと思います。
以下のように白いEthanはInputSystem、赤いEthanは以前からあるInputManagerを使った移動を行わせていて、多少動きに違いはありますが同じように出来ました。
InputSystemを使ったキャラクター操作機能の作成
キャラクターの移動に必要なCharacterControllerの取り付けやAnimatorControllerの作成等はInputManagerと変わらないので以下の記事を参照して作成してみてください。


InputManagerを使ったキャラクターの移動スクリプトは以下のような感じになります。
1 2 3 4 5 6 7 8 9 10 11 12 13 14 15 16 17 18 19 20 21 22 23 24 25 26 27 28 29 30 31 32 33 34 35 36 37 38 39 40 41 42 43 44 45 46 | using System.Collections; using System.Collections.Generic; using UnityEngine; public class OldInputCharacter : MonoBehaviour { private CharacterController characterController; private Animator animator; private Vector3 velocity; [SerializeField] private float walkSpeed = 2f; [SerializeField] private float jumpPower = 5f; // Start is called before the first frame update void Start() { characterController = GetComponent<CharacterController>(); animator = GetComponent<Animator>(); } // Update is called once per frame void Update() { if(characterController.isGrounded) { velocity = Vector3.zero; var input = new Vector3(Input.GetAxis("Horizontal"), 0f, Input.GetAxis("Vertical")); if(input.magnitude > 0f) { transform.LookAt(transform.position + input); velocity = transform.forward * walkSpeed; animator.SetFloat("Speed", input.magnitude); } else { animator.SetFloat("Speed", 0f); } if(Input.GetButtonDown("Jump")) { velocity.y += jumpPower; } } velocity.y += Physics.gravity.y * Time.deltaTime; characterController.Move(velocity * Time.deltaTime); } } |
InputManagerで設定したボタンはInput.GetAxisやInput.GetButtonDown等で取得出来ました。
しかしInputSystemを使う場合は以下の記事に記したようにいくつかの方法があります。

今回は2パターン作成してみます。
キャラクターにはCharacterControllerとAnimatorコンポーネントが既に取り付けられているとして、InputSystemの機能を使うには上の記事のようにInputSystemのインストールやアクション設定ファイルの作成とPlayerInputコンポーネントの取り付けが必要になりますので設定してみてください。
新しくアクション設定ファイルを作成するのが面倒な方はPackages/Input System/InputSystem/Plugins/PlayerInput内にDefaultInputActionsという名前のアクション設定ファイルがありますのでそちらをPlayerInputActionsに設定してもかまいません。
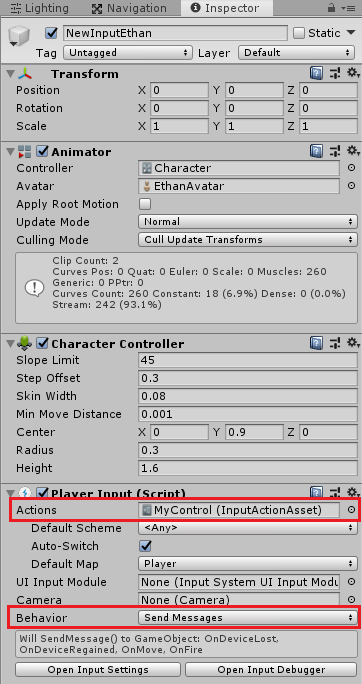
今回のキャラクターは以下のような感じに設定します。
わたくしの場合は作成したアクション設定ファイル名をMyControlにしています。
BehaviourにはSendMessageを設定します。
これでInputSystemで動かすキャラクターの設定が出来たので、後はその機能を使って入力値を取得しキャラクターを動かすスクリプトを作成し、キャラクターに取りつけます。
Updateメソッド内で入力値を取得
まずはInputManagerの時と同じようにUpdateメソッド内で入力値を取得する方法をしてみます。
1 2 3 4 5 6 7 8 9 10 11 12 13 14 15 16 17 18 19 20 21 22 23 24 25 26 27 28 29 30 31 32 33 34 35 36 37 38 39 40 41 42 43 44 45 46 47 48 49 50 51 52 53 54 | using System.Collections; using System.Collections.Generic; using UnityEngine; using UnityEngine.InputSystem; public class NewInputCharacter : MonoBehaviour { private CharacterController characterController; private Animator animator; private Vector3 velocity; [SerializeField] private float walkSpeed = 2f; [SerializeField] private float jumpPower = 5f; private PlayerInput playerInput; private InputAction moveAction; private InputAction jumpAction; // Start is called before the first frame update void Start() { characterController = GetComponent<CharacterController>(); animator = GetComponent<Animator>(); playerInput = GetComponent<PlayerInput>(); moveAction = playerInput.currentActionMap.FindAction("Move"); jumpAction = playerInput.currentActionMap.FindAction("Jump"); // 他の取得法 // moveAction = playerInput.actions["Move"]; } // Update is called once per frame void Update() { if (characterController.isGrounded) { velocity = Vector3.zero; // 入力値を取得 var input = new Vector3(moveAction.ReadValue<Vector2>().x, 0f, moveAction.ReadValue<Vector2>().y); if (input.magnitude > 0f) { transform.LookAt(transform.position + input); velocity = transform.forward * walkSpeed; animator.SetFloat("Speed", input.magnitude); } else { animator.SetFloat("Speed", 0f); } // ジャンプ if(jumpAction.triggered) { velocity.y += jumpPower; } } velocity.y += Physics.gravity.y * Time.deltaTime; characterController.Move(velocity * Time.deltaTime); } } |
Startメソッドで自身のPlayerInputの現在のアクションマップからMoveアクションを取得します。
UpdateメソッドではInput.GetAxis(“Horizontal”)やInput.GetAxis(“Vertical”)の代わりにmoveAction.ReadValue
リスナーのメソッドで入力値を設定
次はイベントリスナーを使って入力値を設定するやり方です。
1 2 3 4 5 6 7 8 9 10 11 12 13 14 15 16 17 18 19 20 21 22 23 24 25 26 27 28 29 30 31 32 33 34 35 36 37 38 39 40 41 42 43 44 45 46 47 48 49 50 51 52 53 54 | using System.Collections; using System.Collections.Generic; using UnityEngine; using UnityEngine.InputSystem; public class NewInputCharacter2 : MonoBehaviour { private CharacterController characterController; private Animator animator; private Vector3 input; private Vector3 velocity; [SerializeField] private float walkSpeed = 2f; [SerializeField] private float jumpPower = 5f; private bool jumping; // Start is called before the first frame update void Start() { characterController = GetComponent<CharacterController>(); animator = GetComponent<Animator>(); } // Update is called once per frame void Update() { if (characterController.isGrounded) { velocity = Vector3.zero; // 入力値を取得 if (input.magnitude > 0f) { transform.LookAt(transform.position + input); velocity = transform.forward * walkSpeed; animator.SetFloat("Speed", input.magnitude); } else { animator.SetFloat("Speed", 0f); } if(jumping) { velocity.y += jumpPower; jumping = false; } } velocity.y += Physics.gravity.y * Time.deltaTime; characterController.Move(velocity * Time.deltaTime); } public void OnMove(InputValue inputValue) { input = new Vector3(inputValue.Get<Vector2>().x, 0f, inputValue.Get<Vector2>().y); Debug.Log(input); } public void OnJump() { jumping = true; } } |
入力値inputをフィールドで用意しておきイベントリスナーのOnMoveが実行された時に引数でIntValue型のintValueを受け取り、Getメソッドで値を取得しinputフィールドに保持します。
Jumpアクションのボタンが押されたらOnJumpが呼ばれjumpingをtrueにしてUpdateメソッドのジャンプ判定で上向きの速度を加えjumpingをfalseにしています。
Updateメソッドでは入力値の計算の部分を排除します。
PlayerInputManagerを使ったローカルマルチプレイ
InputSystemを使ったキャラクターの操作機能が出来たので、それを使って他の事もしてみます。
PlayerInputManagerコンポーネントを使うとローカルゲームで複数のコントローラーの制御をしてくれます。
ヒエラルキー上のキャラクターをAssetsフォルダ内にドラッグ&ドロップしてプレハブにします。
このプレハブを個々のキャラクターとします。
ヒエラルキー上のキャラクターは削除します。
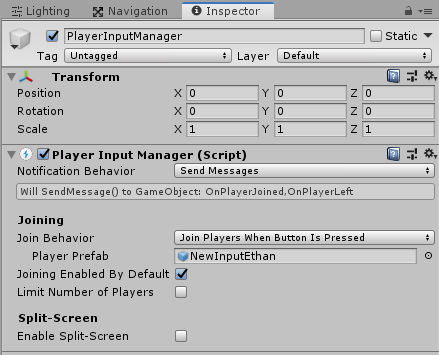
ヒエラルキー上で右クリックからCreate Emptyを選択し、名前をPlayerInputManagerとし、インスペクタのAdd ComponentからInput→PlayerInputManagerを選択し取り付けます。
Notification Behaviourは通知する行動設定で、
SendMessagesはアクションに設定したキーやボタンが押された時に、ゲームオブジェクトに取り付けたスクリプトのアクションと同名のメソッドを呼び出します。
Broadcast Messagesは子要素を含めて呼び出します。
Invoke Unity Eventsはアクションが実行された時に呼び出すメソッドを自分で指定します。
Invoke C Sharp Eventsは自分でスクリプト内でイベントのコールバックを指定します。
Join BehaviourはPlayer Prefabに設定したキャラクターを参加させる時の条件です。
Join Players When Button Is Pressedは入力デバイスのボタンを押した時で、そのデバイスでキャラクターを操作します。
Join Players When Join Action Is Triggerdは参加する時のボタンを設定し、そのボタンを押した時に新しいキャラクターが参加します。そのデバイスでキャラクターを操作します。
Join Players Manuallyはスクリプトを使用して新しいキャラクターを参加させます。UI等を操作した時のデバイスや空いているデバイスを自動?設定しキャラクターを操作します。
Joining Enable By Defaultにチェックを入れると参加するキャラクターはJoin Behaviourで設定したメカニズムで参加します。
Limit Number Of Playersは参加出来る人数制限を使用する時にチェックして設定出来ます。
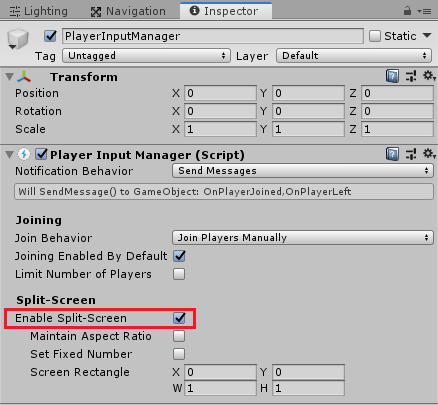
Enable Split-Screenにチェックを入れると新しいキャラクターが参加した時にゲーム画面を分割します。
ボタンを押した時に新しいキャラクターを参加させる
PlayerInputManagerのJoin BehaviourをJoin Players When Button Is Pressedにしておくとボタンを押したデバイスでPlayer Prefabに設定したキャラクターを配置して操作する事が出来ます。
今回はUIのボタンを押した時に新しいキャラクターを配置し操作するデバイスは自動で空いているものを設定することにします。
PlayerInputManagerの設定
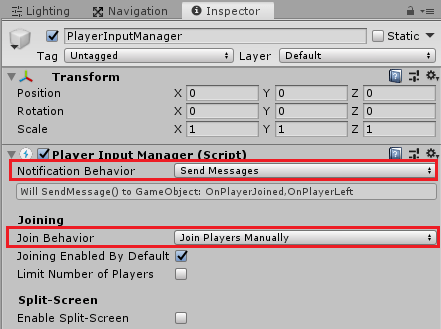
まずはPlayerInputManagerの設定をします。
Notification BehaviourをSendMessageにします。
Join BehaviourをJoin Players Manuallyにしスクリプトから新しいキャラクターを参加させます。
新しいキャラクターを生成するスクリプト
新しいキャラクターを生成するスクリプトを作成します。
PlayerInputManagerゲームオブジェクトに新しくInstantiateCharacterScriptを作成し取り付けます。
1 2 3 4 5 6 7 8 9 10 11 12 13 14 15 16 17 18 19 20 21 22 23 24 25 26 27 28 29 | using System.Collections; using System.Collections.Generic; using UnityEngine; using UnityEngine.InputSystem; public class InstantiateCharacterScript : MonoBehaviour { [SerializeField] private GameObject player; // Start is called before the first frame update void Start() { PlayerInput.Instantiate(player); } public void InstantiateCharacter() { PlayerInput.Instantiate(player); } public void OnPlayerJoined(PlayerInput playerInput) { Debug.Log("参加"); foreach (var device in playerInput.devices) { Debug.Log("操作デバイス" + device); } } } |
playerにはインスペクタでプレハブにしたPlayerInputコンポーネントを持つキャラクターを設定します。
Startメソッドで一人のキャラクターをPlayerInput.Instantiateメソッドを使ってインスタンス化します。
InstantiateCharacterメソッドはボタンを押した時に呼び出すようにします。
新しいキャラクターが参加するうとOnPlayerJoinedメソッドが呼ばれるので、そこで参加したキャラクターの操作デバイスをコンソールに出力しています。
ボタンの作成
単純なボタンを作成します。
ヒエラルキー上で右クリックからUI→Buttonを選択します。
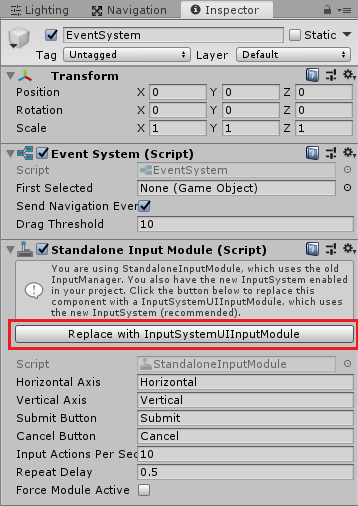
ヒエラルキー上に出来たEventSystemのインスペクタのStandalone Input ModuleのReplace with InputSystemUIInputModuleボタンを押します。
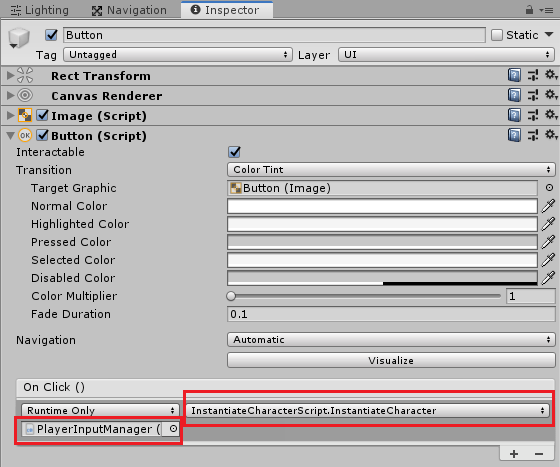
ButtonのインスペクタのOn ClickにPlayerInputManagerゲームオブジェクトのInstantiateCharacterメソッドを設定します。
Unityのプレイボタンを押して実行してみましょう。
以下のようにキーボード、PS4コントローラー等、デバイス毎にキャラクターを動かせるようになりました。
PS3コントローラーはWindowsでは対応していないですが、とりあえず動かす時に使ってキーボード、PS3コントローラー、PS4コントローラーで個別に動かすように出来ました。
キャラクター毎に画面分割をする
複数のキャラクターをゲーム内に配置しそれぞれのデバイスで操作することが出来ました。
次は一つのカメラで全体を映すのではなく、操作キャラクター毎に画面を分割し、個別のカメラを持つようにします。
まずはPlayerInputManagerの設定を変更します。
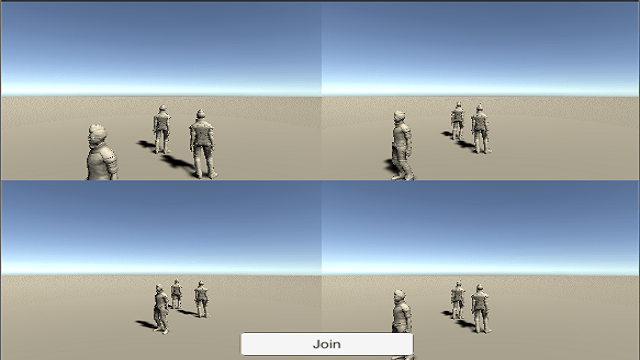
Enable Split-Screenにチェックを入れるとキャラクターが参加したら画面を自動で分割することが出来ます。
ただプレハブ化したキャラクターのPlayerInputにそのキャラクター用のカメラの設定をしなければいけません。
ボタンを押したら新しくキャラクターを参加させる別のスクリプトInstantiateCharacterScript2スクリプトを作成しPlayerInputManagerゲームオブジェクトに取り付けます。
1 2 3 4 5 6 7 8 9 10 11 12 13 14 15 16 17 18 19 20 21 22 23 24 25 26 27 28 29 30 31 32 33 34 35 36 37 38 39 40 41 42 43 | using System.Collections; using System.Collections.Generic; using UnityEngine; using UnityEngine.InputSystem; using UnityStandardAssets.Utility; public class InstantiateCharacterScript2 : MonoBehaviour { private PlayerInputManager playerInputManager; [SerializeField] private GameObject player; // Start is called before the first frame update void Start() { playerInputManager = GetComponent<PlayerInputManager>(); InstantiateCharacter(); } public void InstantiateCharacter() { // 空のゲームオブジェクトを作成。プレイヤー番号を付加した名前にする GameObject cameraObj = new GameObject("Camera" + playerInputManager.playerCount); // 空のゲームオブジェクトにCameraコンポーネントを追加 cameraObj.AddComponent<Camera>(); // カメラゲームオブジェクトにFollowTargetスクリプトを追加 var followTarget = cameraObj.AddComponent<FollowTarget>(); // インスタンス化するキャラクターのPlayerInputのcameraに今作ったカメラを設定 player.GetComponent<PlayerInput>().camera = cameraObj.GetComponent<Camera>(); // キャラクターをインスタンス化 var playerInput = PlayerInput.Instantiate(player); // FollowTargetスクリプトの設定をする followTarget.target = playerInput.transform; followTarget.offset = new Vector3(0f, 2f, -5f); } public void OnPlayerJoined(PlayerInput playerInput) { Debug.Log("参加"); foreach (var device in playerInput.devices) { Debug.Log("操作デバイス" + device); } } } |
StartメソッドではInstantiateCharacterメソッドを呼んで実行するようにします。
InstantiateCharacterメソッドでは最初に空のゲームオブジェクトをインスタンス化しますが、その時にゲームオブジェクトの名前をCamera+現在のプレイヤー数にします。
空のゲームオブジェクトにAddComponentを使ってCameraコンポーネントを取り付けます。
さらにFollowTargetスクリプトも取り付けます。
キャラクターのプレハブ(player)のPlayerInputコンポーネントのcameraに今作成したCameraゲームオブジェクトを設定します。
その後キャラクターをインスタンス化しfollowTargetのターゲットにインスタンス化したキャラクターを設定したり、オフセット値の設定をします。
これでスクリプトが出来たので、ボタンを押した時に実行するメソッドをInstantiateCharacterScriptのInstantiateCharacterからInstantiateCharacterScript2のInstantiateCharacterメソッドに変更します。
これで完成しました。
Unityのプレイボタンを押して実行してみましょう。
上のようになりました。
自動で画面を分割してくれるのは助かりますね。
終わりに
InputSystemはまだプレビュー版のせいなのかPS4コントローラーを接続した時にPS3コントローラーのスキームが残っていたり、うまく動作しないことがありますね。
単純にわたくしのパソコンかコントローラーがおかしかったり、PlayerInputやPlayerInputManagerの使い方が間違っているというのも否めないですが・・・・(^_^;)
