今回はUnityのPostProcessingStackのプロファイルとボリュームをスクリプトから操作をしてみたいと思います。
PostProcessProfileはポストプロセスの設定ファイルでPostProcessVolumeはPostProcessProfileを設定するコンポーネントです。
ポストプロセスに関してとそれぞれの設定の仕方については
を参照してください。
今回行う事は、
スクリプトでPostProcessVolumeコンポーネントをゲーム中にゲームオブジェクトに取り付けエフェクトを追加する事。
作成済みのPostProcessProfileの設定をゲーム中にスクリプトから変更する事。
の2点です。
他のゲームオブジェクトを配置
ポストプロセスの効果を確認する為にいくつか他のゲームオブジェクトをヒエラルキー上に配置しておきます。
ヒエラルキー上で右クリック→3D Object→Planeを選択し、TransformのScaleのXYZを全て10にします。
スタンダードアセットのThirdPersonControllerプレハブをヒエラルキー上に配置します。
これで地面とその上を動くキャラクターが配置されました。
今回はポストプロセスの効果を確認するだけなので適当にゲームオブジェクトを配置してください。
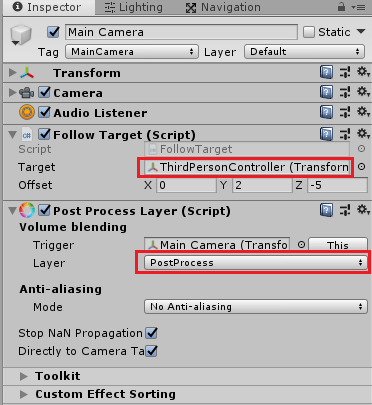
次にMain Cameraゲームオブジェクトを選択し、インスペクタのAdd ComponentからFollow Targetを追加し、TargetにThirdPersonControllerをドラッグ&ドロップします。
これでキャラクターの動きに合わせてカメラが移動します。
さらにAdd ComponentからRendering→Post-Process Layerを取り付けます。
LayerにはPostProcessレイヤーを設定します(レイヤーが存在しない時は作成してください)。
LayerはPostProcessVolumeコンポーネントに設定したレイヤーと同じレイヤーを指定します。
今回はPostProcessVolumeはスクリプトから作成するのでその設定するゲームオブジェクトに、あとでPostProcessレイヤーを設定します。
スクリプトからPostProcessVolumeを取り付ける
スクリプトからPostProcessVolumeをゲームオブジェクトに取り付けエフェクトを発生させてみます。
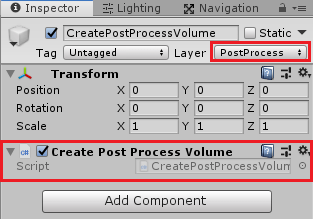
ヒエラルキー上で右クリック→Create Emptyを選択し、名前をCreatePostProcessVolumeとします。
CreatePostProcessVolumeゲームオブジェクトのレイヤーをPostProcessに設定します。
次に新しくCreatePostProcessVolumeスクリプトを作成し取り付けます。
1 2 3 4 5 6 7 8 9 10 11 12 13 14 15 16 17 18 19 20 21 22 23 24 25 26 27 | using System.Collections; using System.Collections.Generic; using UnityEngine; using UnityEngine.Rendering.PostProcessing; public class CreatePostProcessVolume : MonoBehaviour { private PostProcessVolume postProcessVolume; // Start is called before the first frame update void Start() { // Bloom効果のインスタンスの作成 Bloom bloom = ScriptableObject.CreateInstance<Bloom>(); bloom.enabled.Override(true); bloom.intensity.Override(20f); // ポストプロセスボリュームに反映 postProcessVolume = PostProcessManager.instance.QuickVolume(gameObject.layer, 0f, bloom); } void OnDestroy() { // 作成したボリュームの削除 RuntimeUtilities.DestroyVolume(postProcessVolume, true, true); } } |
StartメソッドでScriptableObject.CreateInstanceを使ってBloomのインスタンスを作成します。
作成したbloomインスタンスのenableのOverrideでtrueを設定しエフェクトを有効にします。
bloomのintensityのOverrideで20fを設定しBloom効果の強度を設定します。
Bloomの設定が終わったらPostProcessManager.instance.QuickVolumeメソッドを使ってPostProcessVolumeに設定をします。
QuickVolumeの引数は第1引数がPostProcessVolumeのレイヤーで今回はgameObject.layerでCreatePostProcessVolumeゲームオブジェクトに設定されたレイヤーを指定し、第2引数ではPostProcessVolumeの優先度を指定し、第3引数は設定する効果を指定します。
作成したボリュームは使わなくなったら削除する必要があるみたいなので、OnDestroyメソッドの中でRuntimeUtilities.DestroyVolumeメソッドを使って作成したボリュームの削除を行っています。
DestroyVolumeの第1引数はPostProcessVolume、第2引数は指定したボリュームを削除するかどうか、第3引数はボリュームのゲームオブジェクトを削除するかどうかのようです。
PostProcessVolumeが追加されたかどうか確認する
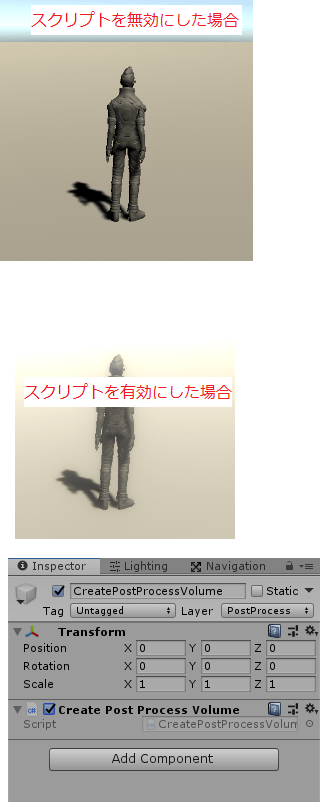
スクリプトが出来たのでUnityを実行してポストプロセスの効果が出るかどうか確認してみましょう。
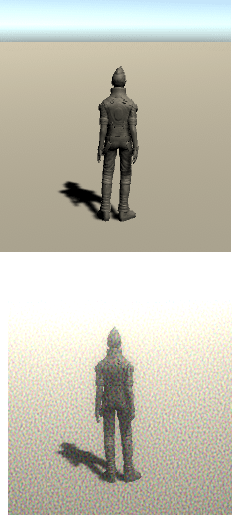
上のようにPostProcessVolumeがスクリプトから追加され効果が出ているのを確認出来ます。
ただしCreatePostProcessVolumeゲームオブジェクトにPostProcessVolumeコンポーネントは追加されていません。
ここら辺はAddComponentでPostProcessVolumeコンポーネントを追加するのではなく、QuickVolumeメソッドを使って追加したからかもしれません。
スクリプトからPostProcessProfileの設定値を変更する
次はあらかじめPostProcessVolumeに設定しているPostProcessProfileの設定値をゲーム中にスクリプトから変更してみます。
先ほど作ったCreatePostProcessVolumeゲームオブジェクトのインスペクタでチェックを外し無効にしておきます。
ヒエラルキー上で右クリック→3D Object→Post-process Volumeを選択します。
これでPostProcessVolumeコンポーネントが設定されたゲームオブジェクトが作成されます。
次にAssetsフォルダ内で右クリック→Create→Post-processing Profileを選択します。
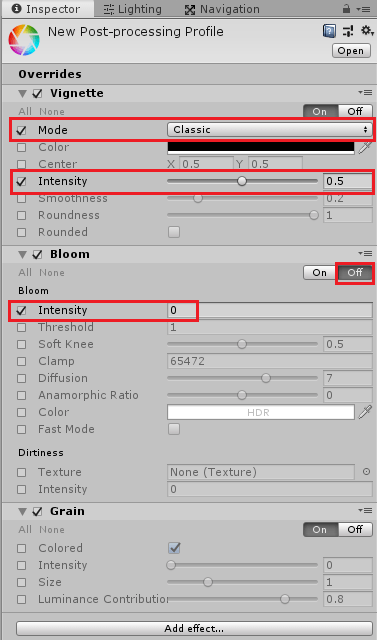
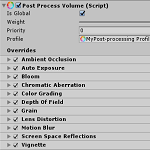
作成されたNew Post-processing Profile.assetファイルを選択し、インスペクタのAdd effect…ボタンを押してVignette、Bloom、Grainの効果を加えます。
BloomはenableのOffボタンを押して無効にしておきます。
あとでスクリプトからこれらの設定値を変更します。
設定が終わったらPost-process VolumeゲームオブジェクトのPostProcessVolumeコンポーネントのProfileに今作成したNew Post-processing Profile.assetファイルをドラッグ&ドロップします。
新しくOverridePostProcessスクリプトを作成しPost-process Volumeゲームオブジェクトに取り付けます。
1 2 3 4 5 6 7 8 9 10 11 12 13 14 15 16 17 18 19 20 21 22 23 24 25 26 27 28 29 30 31 32 33 34 35 36 37 38 39 40 41 42 43 44 45 46 47 48 49 50 51 | using System.Collections; using System.Collections.Generic; using UnityEngine; using UnityEngine.Rendering.PostProcessing; public class OverridePostProcess : MonoBehaviour { [SerializeField] private PostProcessVolume postProcessVolume; private PostProcessProfile postProcessProfile; // Start is called before the first frame update void Start() { // このボリュームのみ適用 postProcessProfile = postProcessVolume.profile; // 同じプロファイルを使用した他のボリュームにも適用 //postProcessProfile = postProcessVolume.sharedProfile; Bloom bloom = postProcessProfile.GetSetting<Bloom>(); bloom.enabled.Override(true); bloom.intensity.Override(20f); // MotionBlurエフェクトの追加 MotionBlur motionBlur = postProcessProfile.AddSettings<MotionBlur>(); motionBlur.enabled.Override(true); motionBlur.shutterAngle.Override(360f); // エフェクトが存在するかどうか? bool hasVignetteEffect = postProcessProfile.HasSettings<Vignette>(); Debug.Log("hasVignetteEffect: " + hasVignetteEffect); // エフェクトがあるかどうかの判断と取得を同時に行う Grain grain; bool hasGrainEffect = postProcessProfile.TryGetSettings<Grain>(out grain); if(hasGrainEffect) { grain.enabled.Override(true); grain.intensity.Override(1f); } // エフェクトを削除 postProcessProfile.RemoveSettings<Vignette>(); } void OnDestroy() { // 作成したプロファイルの削除 RuntimeUtilities.DestroyProfile(postProcessProfile, true); } } |
インスペクタでPostProcessVolumeコンポーネントを設定出来るようにし、同じゲームオブジェクトに取り付けたPostProcessVolumeコンポーネントを設定します。
StartメソッドでpostProcessProfile.GetSetting
この時注意が必要なのがprofileとsharedProfileの違いです。
プロファイルの効果を取得するにはGetSettingsメソッドを使います。
1 2 3 | GetSetting<Bloom>(); |
プロファイルに新しいエフェクトを追加するにはAddSettingsメソッドを使います。
1 2 3 | AddSettings<MotionBlur>(); |
を使用しますがPostProcessProfileをsharedProfileで取得していると何やらエラーが出てきます。(^_^;)
実行中に変更した設定値を元に戻すためにもpostProcessProfile.profileで取得でいいかも?
エフェクトが存在するかどうかは、HasSettingsメソッドを使います。
1 2 3 | HasSettings<Vignette>(); |
を使います。
またエフェクトが存在した場合にそのエフェクトのインスタンスを取得するにはTryGetSettingsメソッドを使います。
1 2 3 | TryGetSettings<Grain>(out grain); |
エフェクトを削除する場合はRemoveSettingsを使います。
1 2 3 | RemoveSettings<Vignette>(); |
OnDestroyメソッドで作成したプロファイルの削除をしています。
ゲーム中にPostProcessProfileが更新されるか確認
機能が出来たのでUnityを実行して確認してみます。
スクリプトで変更した効果が現れました。
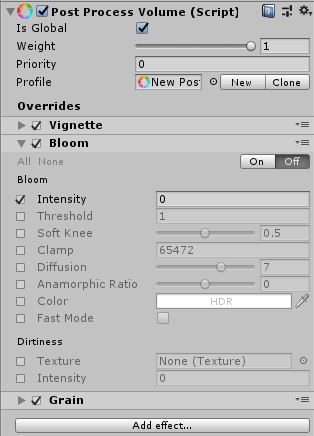
以下がスクリプトからPostProcessProfileの設置値を変更する前の状態です。
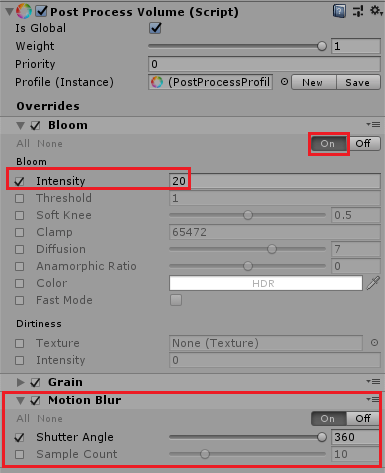
以下がスクリプトからPostProcessProfileの設定値を変更した後の状態です。
Vignetteが削除され、BloomとGrainの設定値が変更され、新しくMotion Blurの効果が追加されています。

